Adding Data An Access database is not a file in the same sense as a Microsoft Office Word document or a Microsoft Office PowerPoint are. Instead, an Access database is a collection of objects like tables, forms, reports, queries etc. that must work together for a database to function properly. We have now created two tables with all of the fields and field properties necessary in our database. To view, change, insert, or delete data in a table within Access, you can use the table’s Datasheet View. A datasheet is a simple way to look at your data in rows and columns without any special formatting. Whenever you create a new web table, Access automatically creates two views that you can start using immediately for data entry. A table open in Datasheet View resembles an Excel worksheet, and you can type or paste data into one or more fields. You do not need to explicitly save your data. Access commits your changes to the table when you move the cursor to a new field in the same row, or whe...
Add & Format Tables Powerpoint 2010
One of the most powerful data representation techniques is the use of tables. Tables allow information to be segregated making them easy to read. PowerPoint has features that let you add tables in slides and also format them to enhance their visual effects. What's more, these tables are also compatible with Microsoft Excel, so you can basically take a spreadsheet or a section of a spreadsheet and paste it into a slide as a table.
Given below are the steps to add a table in PowerPoint.
Step (1): Go to Tables group under Insert ribbon

Step (2): Click on the dropdown and select your table dimension from the matrix.

Step (3): If you require more than 10 columns or 8 rows click on "Insert Table" to open the Insert Table dialog where you can specify the column and row count.

PowerPoint table is a simple table that does not support the mathematical features of an Excel spreadsheet. If you want to carry out some calculations you can insert an Excel spreadsheet instead of a regular table by choosing the

This will insert the spreadsheet in the slide and as long as the spreadsheet is selected, the ribbon at the top would be changed to Excel ribbon instead of PowerPoint one.

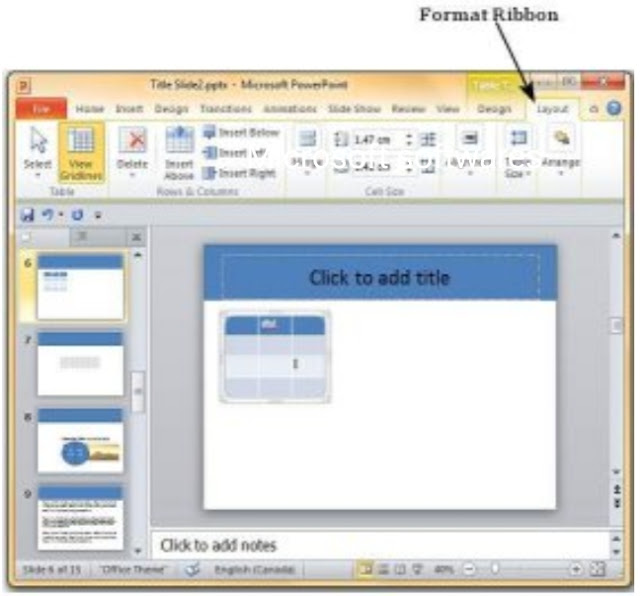
The PowerPoint table formatting features have been grouped under two ribbons: Design and Format. The sections below discuss the features under each ribbon. To access these ribbons you must select the table first.
Table Design Features
The table below describes various table design features in PowerPoint.

| Feature | Sub Features | Description |
|---|---|---|
| Table Style Options | Header Row | Adds a different shade to the first row to distinguish it |
| Total Row | Adds a different shade to the last row to distinguish it | |
| Banded Rows | Shades alternate rows in the table with the same color | |
| First Column | Adds a different shade to the first column to distinguish it | |
| Last Column | Adds a different shade to the last row to distinguish it | |
| Banded Columns | Shades alternate columns in the table with the same color | |
| Table Styles | Shading | Offers different shades to be added to selected table/ row/ column/ cell. You can pick from solid shade, texture, image or gradient shading |
| Border | Offers different border options for the table. You can edit the border color, thickness and style | |
| Effects | Offers the ability to create table shadow or reflection. You can also create bevels for individual cells | |
| Word Art Styles | Text Fill | Allows you to change the color of the text within the table |
| Text Outline | Allows you to add an outline to the text within the table and change the outline color, weight and style | |
| Text Effects | Allows you to add special effects (like reflection, shadow etc.) to the text within the table | |
| Quick Styles | Contains a list of pre-defined Word Art styles that can be applied to the selected text within the table with a single click | |
| Draw Borders | Pen Style | Defines the style of the table border when you draw it |
| Pen Weight | Defines the thickness of the table border when you draw it | |
| Pen Color | Defines the color of the table border when you draw it | |
| Draw Table | Allows you to append new rows, columns, cells to existing table, split existing rows, columns or cells and draw brand new tables | |
| Eraser | Allows you to delete table borders and merge cells, rows or columns |
Table Format Features
The table below describes various table format features in PowerPoint.
| Feature | Sub Features | Description |
|---|---|---|
| Table | Select | Allows you to select the entire table or the row(s) or column(s) depending on your cursor position |
| View Gridlines | Toggle the gridline display within the table | |
| Rows & Columns | Delete | Allows you to delete selected row(s) or column(s) or the entire table |
| Insert Above | Inserts a row above the row where the cursor is currently. If you haven't placed the cursor within the table, it adds a new row at the top of the table | |
| Insert Below | Inserts a row below the row where the cursor is currently. If you haven't placed the cursor within the table, it adds a new row at the bottom of the table | |
| Insert Left | Inserts a column to the left of the column where the cursor is currently. If you haven't placed the cursor within the table, it adds a new column to the left of the table | |
| Insert Right | Inserts a column to the right of the column where the cursor is currently. If you haven't placed the cursor within the table, it adds a new column to the right of the table | |
| Merge | Merge | Allows you to merge cells, rows or columns. This is enabled only if you have selected more than one cell, row or column |
| Split Cells | Allows you to specify the number of rows and columns into which the current section of cell(s) need to be split | |
| Cell Size | Height/ Width | Define the height and width of the selected cell. You must realise that usually if you change these aspects for a single cell it would affect the entire row or column too |
| Distribute Rows | Equalises the height of all the rows to fit the current table height | |
| Distribute Columns | Equalises the width of all the columns to fit the current table width | |
| Alignment | Horizontal Alignment | Allows you to align the selected text to the left, right or center of the cell |
| Vertical Alignment | Allows you to align the selected text to the top, bottom or middle of the cell | |
| Text Direction | Allows you to change the direction of the selected text within the cells | |
| Cell Margins | Allows you to define the margins within the cell | |
| Table Size | Height | Allows you to adjust the table height - it retains the relative heights of the individual rows while changing the overall table height |
| Width | Allows you to adjust the table width - it retains the relative widths of the individual columns while changing the overall table width | |
| Lock Aspect Ratio | Checking this box will ensure the ratio between the table height and width is maintained when one of these is changed | |
| Arrange | Bring Forward | Allows you to move the table up by one layer or right to the top |
| Send Backward | Allows you to move the table down by one layer or right to the bottom of the slide | |
| Selection Pane | Toggles the Selection and Visibility sidebar | |
| Align | Allows you to align the entire table with reference to the slide |
Wow, amazing block structure! How long
ReplyDeleteHave you written a blog before? Working on a blog seems easy.
The overview of your website is pretty good, not to mention what it does.
In the content!
vstpatch.net
Refx Nexus VST Crack
MixMeister Fusion Crack
Microsoft Office Crack
iBackupBot Crack
Spectrasonics Keyscape Crack