Adding Data An Access database is not a file in the same sense as a Microsoft Office Word document or a Microsoft Office PowerPoint are. Instead, an Access database is a collection of objects like tables, forms, reports, queries etc. that must work together for a database to function properly. We have now created two tables with all of the fields and field properties necessary in our database. To view, change, insert, or delete data in a table within Access, you can use the table’s Datasheet View. A datasheet is a simple way to look at your data in rows and columns without any special formatting. Whenever you create a new web table, Access automatically creates two views that you can start using immediately for data entry. A table open in Datasheet View resembles an Excel worksheet, and you can type or paste data into one or more fields. You do not need to explicitly save your data. Access commits your changes to the table when you move the cursor to a new field in the same row, or whe...
Printing Documents in Word 2010
Consider you are done with previewing and proofing your document and ready for the final printing. This chapter will teach you how to print a part or complete Microsoft Word document.
Printing Documents:
Following are the simple steps to print your Microsoft Word Document.
Step (1): Open the document for which you want to see the preview. Next click the File tab and then Print option which will display a preview of the document in the right column. You can scroll up or scroll down your document to walk through the document using given Scrollbar. Middle column gives various options to be set before your send your
document to the printer.

Step (2): You can set various other printing options available. Select from among the following options, depending on your preferences.
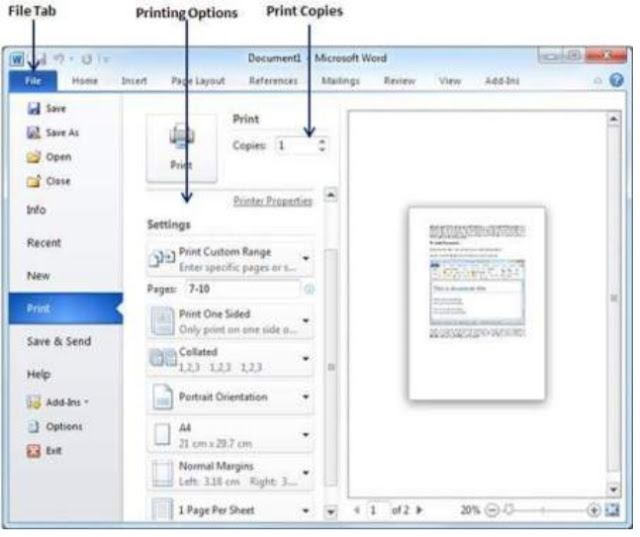
| SN | Option and Description |
|---|---|
| 1 | Copies Set the number of copies to be printed, by default you will have one copy of the document. |
| 2 | Print Custom Range This option will be used to print a particular page of the document just type that number in Pages option, if you want to print all the pages from 7 till 10 then you would have to specify this option as 7-10 and word will print only 7th, 8th, 9th and 10th pages. |
| 3 | Print One Sided By default you print page one side of the page, but there is one more option where you would turn up your page manually in case you want to print your page on both sides of the page. |
| 4 | Collated By default multiple copies will print Collated, but if you are printing multiple copies and you want the copies uncollated, select the Uncollated option. |
| 5 | Orientation By default page orientation is set to Portrait, but if you are willing to print your in landscape mode then select Landscape mode. |
| 6 | A4 By default page size is A4, but you can select other page sizes available in the drop down list. |
| 7 | Custom Margin Click the Custom Margins drop-down list to choose the document margins you want to use. For instance, if you want to print fewer pages, you can create narrower margins; to print with more white space, create wider margins. |
| 8 | 1 Page Per Sheet By default number of pages per sheet is 1 but you can print multiple pages on a single sheet. Select any option you like from the given drop down list by clicking over 1 Page Per Sheet option. |
Step (3): Once you are done with your setting, click on Print button which will send your document to the printer for final printing.
Comments
Post a Comment