
Microsoft Access MS Access Basics Tips and Trick-7

Adding Data An Access database is not a file in the same sense as a Microsoft Office Word document or a Microsoft Office PowerPoint are. Instead, an Access database is a collection of objects like tables, forms, reports, queries etc. that must work together for a database to function properly. We have now created two tables with all of the fields and field properties necessary in our database. To view, change, insert, or delete data in a table within Access, you can use the table’s Datasheet View. A datasheet is a simple way to look at your data in rows and columns without any special formatting. Whenever you create a new web table, Access automatically creates two views that you can start using immediately for data entry. A table open in Datasheet View resembles an Excel worksheet, and you can type or paste data into one or more fields. You do not need to explicitly save your data. Access commits your changes to the table when you move the cursor to a new field in the same row, or whe...

Microsoft word-office ADVANCED OPERATIONS Tips and Tricks-7

Preview Documents in Word 2010


When you are ready for printing your word document, it is always recommended to preview the document before your send document for final printing. During preview of the document you might discover that set margin is not appropriate or many items may not look good after printing so better to fix them after having a preview of the document. You can also have the option to specify which pages to print, select a printer, specify the paper size on which you want to print, and set other printing options.

Preview Documents:

Following are the simple steps to preview your Microsoft Word Document.

Step (1): Open the document for which you want to see the preview.


Step (2): Click the File tab and then Print option which will display a preview of the document in the right column. You can scroll up or scroll down your document to walk through the document using given Scrollbar. In next chapter, we will learn how to print the previewed document and how to set different printing options.
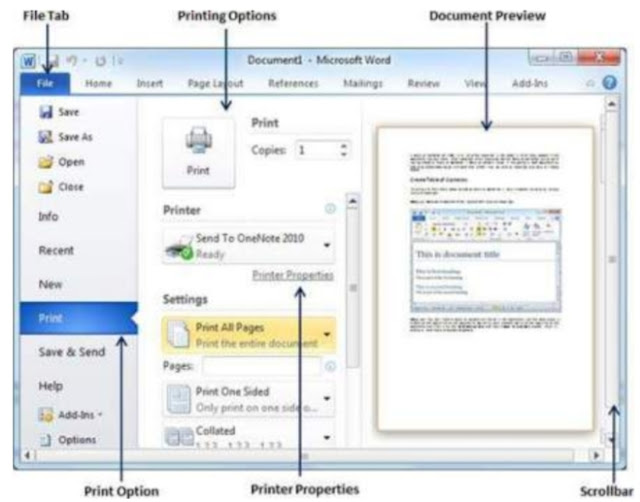

Step (3): Once you are done with your preview, you can click Home tab to go to the actual content of the document.


The beginner to advance and start up step-7


Comments

Popular posts from this blog

Microsoft Excel-office ADVANCED OPERATIONS Tips and Tricks-8

Using Macros in Excel 2010 Macros in MS Excel Macros enable you to automate almost any task that you can undertake in Excel 2010. By using macro recorder from  View Tab » Macro Dropdown  to record tasks that you perform routinely, you not only speed up the procedure considerably but you are assured that each step in a task is carried out the same way each and every time you perform a task. To view macros choose  View Tab » Macro dropdown . Macro Options View tab contains a Macros command button to which a dropdown menu containing the following three options. View Macros  − Opens the Macro dialog box where you can select a macro to run or edit. Record Macro  − Opens the Record Macro dialog box where you define the settings for your new macro and then start the macro recorder; this is the same as clicking the Record Macro button on the Status bar. Use Relative References  − Uses relative cell addresses when recording a macro, making the macro more versatile b...

Microsoft PowerPoint MS POWERPOINT BASICS Tips and Tricks-12

Managing Sections in Powerpoint 2010 Given the popularity of PowerPoint and its versatility, there are situations when you are dealing with very large slide decks or just collaborating with multiple people to build the slides. In such cases, it is always helpful to be able to segregate the slides into smaller groups and work with these groups. PowerPoint 2010 introduces the concept of sections to achieve this. Here are the main functions you can execute with sections. Creating Sections The steps to create a new section are as follows. You can execute these steps from Normal or Slide Sorter views. Step (1):  In  Normal  or  Slide Sorter  view right click at the position where you want to add the section and select add section. Step (2):  The new section gets added to the presentation with all the subsequent slides being included in this section. Step (3):  By default the new section is named "Untitled Section" but you can change the section name. Right ...

Microsoft word-office FORMATTING PAGES Tips and Tricks-2

Add Header and Footer in Word 2010 Headers and footers are parts of a document that contain special information such as page numbers and the total number of pages, the document title, company logo, any photo etc. The header appears at the top of every page, and the footer appears at the bottom of every page. Add Header and Footer: Following are the simple steps to add header and footer in a word document. Step (1):  Click the  Insert tab , and click either  Header button  or  Footer button  whatever you want to add first. Assume you are going to add Header, so when you click  Header button  it will display a list of built-in Headers from where you can choose any of the headers by simply clicking on it. Step (2):  Once you select any of the headers, it will be applied to the document in editable mode and the text in your document will appear dimmed,  Header and Footer buttons  appear on the Ribbon and ...