Adding Data An Access database is not a file in the same sense as a Microsoft Office Word document or a Microsoft Office PowerPoint are. Instead, an Access database is a collection of objects like tables, forms, reports, queries etc. that must work together for a database to function properly. We have now created two tables with all of the fields and field properties necessary in our database. To view, change, insert, or delete data in a table within Access, you can use the table’s Datasheet View. A datasheet is a simple way to look at your data in rows and columns without any special formatting. Whenever you create a new web table, Access automatically creates two views that you can start using immediately for data entry. A table open in Datasheet View resembles an Excel worksheet, and you can type or paste data into one or more fields. You do not need to explicitly save your data. Access commits your changes to the table when you move the cursor to a new field in the same row, or whe...
Borders and Shades in Word 2010
Microsoft Word allows you to place a border on any or all of the four sides of selected text, paragraphs, and pages. You can also add many type of shading to the space occupied by selected text, paragraphs, and pages. This chapter will teach you how to add any of the borders ( left, right, top or bottom) around a text or paragraph or a page and how to add different shadows to them.
Add Borders To Text:
Following are the simple steps to add border to any text or paragraph.
Step (1): Select the text or paragraph to which you want to add border. You can use any of the text selection method to select the paragraph(s).
Step (2): Click the Border Button to display a list of options to put a border around the selected text or paragraph. You can select any of the option available by simply clicking over it.
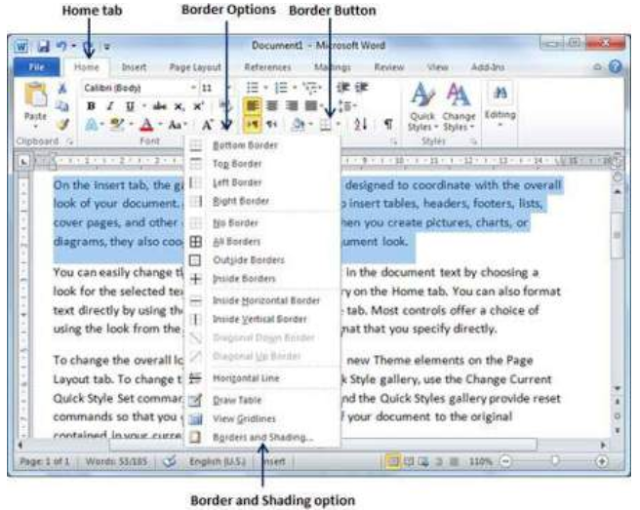
Step (3): Try to add different borders like left, right top or bottom by selecting different options from the border options.

Step (4): To delete the existing border, simply select No Border option from the border options.
Note: You can add a horizontal line by selecting Horizontal Line option from the border options. Otherwise yype --- (three hyphens) and press ENTER. A single, light horizontal line will be created between the left and right margins.
Add Borders To Page:
You can add borders of your choice to word pages by following the simple steps given below.
Step (1): Click the Border Button to display a list of options to put a border. Select Border and Shading option available at the bottom of list of the options as shown in above screen capture. This will display a Border and Shading dialog box. This dialog box can be used to set borders and shading around a selected text or page borders.

Step (2): Click Page Border tab which will display a list of border settings, styles and options whether this border should be applied to the whole document or just one page or first page.
Step (3): You can use Preview section to disable or enable left, right , top or bottom borders of the page. Follow the given instruction in preview section itself.
Step (4): You can customize your border by setting its color, width by using different art available under style section.

You can have similar or even better borders as given below.

Add Shades To Text:
Following are the similar steps to add shades on a selected text or a paragraph(s).
Step (1): Click the Border Button to display a list of options to put a border. Select Border and Shading option available at the bottom of list of the options as shown in above screen capture. This will display a Border and Shading dialog box. This dialog box can be used to set borders and shading around a selected text or page borders.

Step (2): Click Shading tab which will display options to select fill, color and style and whether this border should be applied to Paragraph or Text.
Step (3): You can use Preview section to have an idea about the expected result. Once you are done, click OK button to apply the result.

The beginner to advance.and start up step-9
Comments
Post a Comment